Create a Simple 'Hello World' App With Meteor and Apollo
It's no secret that the Meteor Development Group has been working on a big project called Apollo. It is being developed as a new and better solution for transporting data between your client app and the backend services it depends on.
The aim of Apollo is to serve as the only data stack you'll need, going forward. The Meteor Development Group envisions it as a single, unified, and principled API that any developer can use to build apps on top of in order to connect to backend services.
Built upon the principles of GraphQL, Apollo is service agnostic. It will work with any backend service — whether it's a REST API, MongoDB database, or even a SQL database.
Essentially, Apollo is being designed to focus on the needs of the client app. Therefore, the application delivers only the data the client asks for and minimizes the complexities of where this data comes from. It should work with any Javascript client, including ones implemented with any combination of Angular, React, and Redux. Apollo will even have native mobile support.
Project Ricochet is a full-service digital agency specializing in Meteor, Apollo, and GraphQL.
Is there something we can help you or your team out with?
But what about Meteor? How does Apollo fit into Meteor’s stack and workflow? We've become accustomed to the amazing developer experience that Meteor provides. Meteor specifically chose MongoDB for this reason, even bundling the database along with its distribution. Meteor’s Collection API and Livequery features were designed around MongoDB's own APIs and capabilities. Since this can potentially be replaced by Apollo, it raises several questions:
- How will the Meteor developer experience be affected when Apollo’s new data stack is substituted?
- If Apollo will enable us to use different databases, what are the potential tradeoffs?
- What's the best way to create a Meteor app with Apollo as the data stack?
Given that Apollo is still in development, we don’t have final answers to these questions. We don't yet know what the official release of Apollo will look like. But a technical preview is available. Their team has posted a helpful blog and some starter kits to help you get started. However, unlike Meteor’s roadmap, MDG’s Apollo Team is focusing primarily on getting Apollo production ready for now. They haven’t been too concerned yet with the developer experience, so using it isn’t quite as simple as you’ve come to expect from most things Meteor-related.
To help make it easier to understand, I’ve mapped out steps required to create a “Hello World” Meteor app that utilizes Apollo and a MySQL database. In this exercise, I will walk you through which packages to pull in and what components should be implemented to make it all work.
It will help if you have some basic knowledge of GraphQL. But even if you don't, you’ll still be able to follow along. I’ve aimed to give you just enough information so that you're not coding blind. Certainly, you can’t expect this tutorial to turn you into an Apollo expert. But you’ll gain a better sense of how it works with Meteor with some hands-on experience.
So put your flightsuit on, buckle in, and prepare for launch. Let’s create your first Meteor app using the Apollo stack!
Chart Your Flightplan
Well before any main thrusters should ignite, it will be useful to clarify what we're trying to accomplish. The humble goal of this "Hello World" app will be to retrieve data from a MySQL database and display it on a webpage. That's it. We won’t ask it to write to the database or pull in data from multiple backend services. All that is possible, but we want to keep things simple for now. We’ll take a basic testflight off the launchpad before truly launching into orbit.
Here’s a high level view of the app. It's loosely based on the Apollo Meteor starter kit (version 0.1.6 at this time).
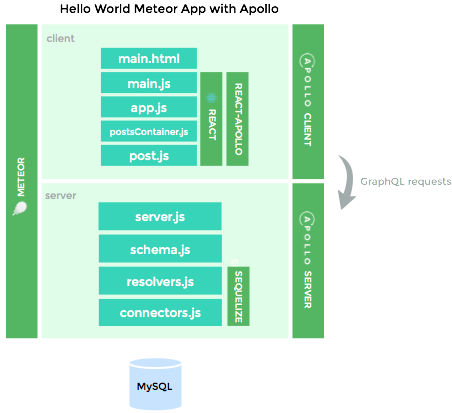
Ultimately, we will create eight Javascript files and one HTML file. Combined with the Apollo, GraphQL, React, and Meteor packages, this is all we'll need to create our Meteor/Apollo app. You can access the completed project here if you’d like: https://github.com/mbanting/meteor-apollo-hello-world
Our Meteor app's client side will function as a GraphQL client. Essentially, it will query for data via GraphQL requests and render this data on a webpage. This will be implemented via four React components; main, app, postsContainer, and post. We'll use the meteor apollo, react-apollo, and apollo-client packages to help us out.
Our Meteor app's server side will act as a GraphQL server. Its main goal will be to respond to these GraphQL requests. We'll use the Apollo Server and Sequelize packages to help us describe our data and how they map to this MySQL database.
Don't worry if you don't understand all the components or terminology yet. The point of this diagram is to provide a map you can refer to as we build out each piece.
Now that we know our destination, let's get started on our journey.
Install the Database
I have a bit of bad news for you. The fact that Meteor comes bundled with MongoDB database has definitely spoiled us. In this case, you actually have to install the database yourself again — just like the old days. On the upside, you won’t be limited to just MongoDB anymore. This is probably the most significant benefit of using Apollo in Meteor.
So in this case, we'll use MySQL. If you don't have it installed, let's do that now. In this example, we're installing MySQL on OSX via brew:
> brew install mysql
Next, start MySQL and create a database named apollodemo
> mysql.server start
> mysql -u root
mysql> CREATE DATABASE apollodemo;
The database is ready, but there's no data yet. We'll get to that soon. For now, let's create our app:
> meteor create apollo-demo
> cd apollo-demo
Implement the Apollo Server
The Apollo stack is composed of the Apollo Client and the Apollo Server. As their names suggest, the Apollo Server responds to the requests sent by the Apollo Client. Let's add Apollo to our app:
> meteor add apollo
> meteor npm install --save apollo-client apollo-server express graphql graphql-tools body-parser
> meteor npm install --save graphql-typings
Now, you’ve added the Apollo package and the npm packages needed to implement your Apollo Server. To be clear, the Apollo Server does not come as a fully formed GraphQL server. Before we instantiate it, it will need a few more pieces of information. The Server will need to know what the data looks like, and how to respond to requests for this data. Let's take the first step there, by describing the data.
Add the Schema
The schema tells Apollo Server what the data looks like. More specifically, it defines the data types and their relationships. To do this, we use the GraphQL schema language.
In /imports/api/schema.js
In this schema, we declare that posts will be the only query supported and that it will accept a single, optional parameter: views. Here, we also tell it to return an array of Posts. Each Post has 3 fields: an id, the content, and number of views.
All that helps describe what the data looks like. But it doesn't instruct on how to retrieve this data. That's the role of the database connectors and resolve functions.
Implement the Database Connectors
The connectors have all the database-specific logic necessary to allow your Apollo Server to read and write data to your database. For example, because we're using MySQL, we'll need to tell Apollo Server how to map objects to the relational tables in our database. Fortunately, an ORM library for Node.js called Sequelize is available to help us out. Let's install this package and the MySQL driver.
> meteor npm install sequelize --save
> meteor npm install mysql --save
Then in /imports/api/connectors.js
First, it creates the connection to the MySQL apollodemo database. We then define the Post model, which tells your Apollo Server via Sequelize how Post objects will map to the posts table and columns in MySQL. Because your app will be getting all the Post information from MySQL, this mirrors the GraphQL schema above. For the future, keep in mind that it's entirely possible to have Post field values come from different backend services. Right now, we still aim to keep this as simple as possible.
Finally, we tell Sequelize to sync the model with the database. This will create the posts table if it doesn't already exist in the apollodemo database.
Add Your Resolve Functions
Now that we have our schema and the connectors to fetch this data, we need to bridge the two together. In the GraphQL world, these are referred to as resolve functions. They tell Apollo Server which connectors will help resolve your schema types.
In /imports/api/resolvers.js
A resolve function will be needed for each field that either returns a non-scalar type or takes any arguments. In our schema, that’s the post field in the Query type. Because the id, content, and views fields in the Post type are scalars, no resolve functions are needed for them.
The parameters in our resolve function are a reference to an instance of the parent type, and the arguments that are passed in. Here, we're not using the first parameter (_). It is a reference to the parent object — in this case an instance of Query. Often the instance of the parent will be needed to resolve the field. For example, if Post had an author field, we'd need this resolve function:
Post: {
   author(post, args) {
      return post.getAuthor();
   }
}
The second parameter, args, is an object that contains any parameters passed into the field. Based on our schema, an optional view parameter can be passed along, as well. Our resolve function will use this to provide a where clause to the query.
Fire up Apollo Server
We now have the minimum components required to start our Apollo Server:
- The schema that defines what our data looks like
- The connectors that implement how to read (and in the future write) this data to their backend services
- The resolvers that map the schema types to their associated connectors
Now, the Apollo package makes instantiating the Apollo Server easy to do with the createApolloServer function.
In /server/server.js
Here, we're combining the schema defined in typeDefs with our resolvers using the makeExecutableSchema function. This executable schema then gets passed to the createApolloServer function to instantiate our Apollo Server. If all goes well, our Meteor app's server side will now be able to accept GraphQL requests on the default /graphql route.
Not only that, but in development mode, GraphiQL is embedded in your app. This in-browser GraphQL IDE allows you to test your Apollo Server.
Test your Apollo Server via GraphiQL now by starting up meteor:
> meteor
Then go to http://localhost:3000/graphiql
Enter the GraphQL query
{
  posts {
    id,
    content,
    views
    }
}
… and run it. You should see something like this:
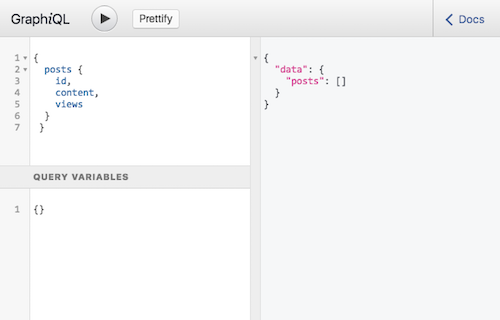
The response returns an empty array of posts. That’s expected since we haven't inserted any records yet. Let's do that now in your MySQL CLI:
mysql> insert into posts (content, views) values ("hello world!", 5);
Now run the same GraphQL query again. You should get back the following response:
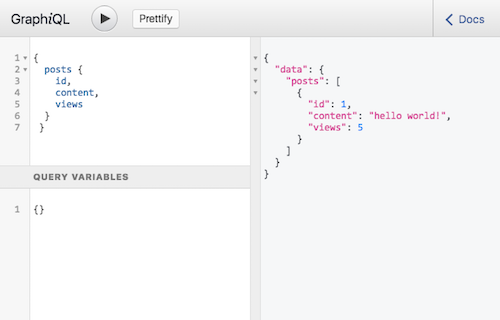
If you did, then you've successfully built your first Apollo Server!
Now, take a moment to recognize what you've done. With four Javascript files, you've built the server-side data stack of Apollo that will allow your Meteor app to talk to a non MongoDB database! This, with all the benefits of GraphQL (that we haven't yet touched on). Congratulations!
Let's finish up this exercise by taking care of the client side of things. With Apollo Client and the react-apollo packages, things are even easier here.
Can Meteor scale?
Learn more about Meteor performance with our white paper on the "Top 10 Meteor Performance Problems" and how to address them.
Implement Your Apollo Client
Let's first remove the unnecessary Blaze and pub/sub packages that come with Meteor by default.
> meteor remove insecure
> meteor remove autopublish
> meteor remove blaze-html-templates
> meteor add static-html
Next, let's install react, and the react-apollo and graphql-tag packages
> meteor npm install --save react react-dom
> meteor npm install react-apollo graphql-tag --save
Retrieving and displaying posts will be achieved through two components; PostsContainer and Post.
Display the Post
Let's start with the easy one, the Post component. It is a simple presentational component that is only concerned with displaying a single post.
In /imports/ui/post.js
Right now, it doesn't have any logic to load data. We'll let the PostsContainer handle that. Its propTypes declares that it's expecting props object with a post property. This post will have a content property of type String. It then renders this within a div.
Things get more interesting with PostsContainer ...
Retrieve the Posts
Let's create the PostsContainer component to retrieve the posts and pass each one to the Post component for rendering.
In /imports/ui/postsContainer.js
We first define the Posts component and its propTypes. It will expect an object with an array property called posts. In its render function, it takes each object in this array and passes it to the Post component for rendering.
Here’s where it gets exciting.
In a “classic” Meteor project (one that isn’t using Apollo), we'd typically use the createContainer function from the react-meteor-data package. In with this approach, we implement a function that retrieves the component's data. This data is then passed as props to the wrapped presentation component. The result is a container component that will rerender the wrapped component when the reactive data changes.
With React and Apollo, we can use the react-apollo package to do something similar. However, instead of passing it a function that retrieves the data, we pass it a GraphQL query.
Remember the GraphQL query we entered in the app's bundled GraphiQL browser? We use the same query here. Being able to test queries and inspect the fields and parameters in GraphiQL before using them in your code can be huge timesaver!
We take this query string and use the gql template literal from the graphql-tag package. Behind the scenes, gql parses the GraphQL query strings into the standard GraphQL abstract syntax tree. In our example, we then assign this to the allPosts constant.
The graphql function imported from react-apollo takes the query, an options object, and the component to wrap (Posts). From this it creates the container component, PostsContainer.
By default, react-apollo will not generate reactive container components. We have to enable this explicitly by providing a pollInterval value in the options object. Currently, the only way reactivity is implemented with react-apollo is through polling. In our example, we configure this container component to check for updates every five seconds. Apollo aims to allow finer-grained control over just how "reactive" we need our components to be.
Wrap up Your Client
Should be ‘all systems go’ from here. You’ll create a top level App component in /imports/ui/App.js
… that renders the PostsContainer component.
You can now delete the existing contents of /client/main.html and replace it with simple HTML with a div to mount our component tree on.:
Finally, you can delete the existing contents of /client/main.js and replace it with this to start everything up:
The goal here is to prepare our React component tree to be able to use Apollo.
In order to do that, we must first instantiate the Apollo Client. If needed, we can customize a few Apollo settings for our Meteor app via meteorClientConfig.
Then we take our Apollo Client and attach it to our component tree using the ApolloProvider component. Any components within this tree will now have access to GraphQL data via Apollo.
Let’s Take Off!
Whew! We're finally here. Let's give it a try by starting it up once again
> meteor
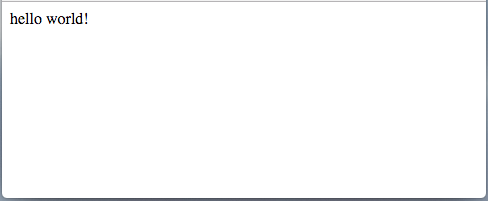
Go to http://localhost:3000
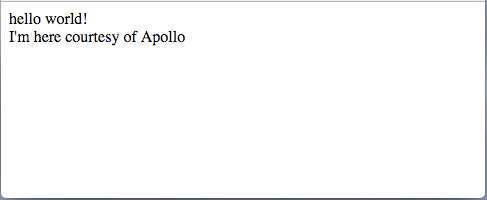
Remember that record we previously inserted into the posts table? If all went well, it should now be displaying on your browser.
If you’d like, try adding another record in MySQL.
mysql> insert into posts (content, views) values ("I'm here courtesy of Apollo", 2);
Since we configured PostContainer to poll for new data every five seconds, it will see this new record and reactively update Posts. You should now see this update on the browser.
Hello New World!
You did it. Using Apollo, you created a Meteor app that retrieves data from MySQL. It's a brave new world, isn’t it?
So, how does this Meteor/Apollo experience compare with "classic" Meteor using MongoDB the Collections API?
In case you’ve kept score, publications aren’t required in Meteor and Apollo but you do have to define the supported queries and provide the resolve functions and database connectors. And, you also had to define your schema with Apollo — but you likely did that anyways with aldeed:simple-schema or collection2 in Meteor. Both ways offer an easy way to create data-aware container components. Lastly, you did have to install MySQL though for use with Apollo.
It's probably unfair to make a comparison at this point. Meteor on its own is a fullstack framework that has four years of end-to-end polish. Our Meteor/Apollo app is composed of a data stack that's barely a few months old— and it’s been fitted into an existing fullstack framework.
At the moment, it feels like Apollo has a higher learning curve. This is something we can probably expect to improve with more documentation and time to focus on the development experience. Having said that, packages like react-apollo and the Apollo Meteor package make things reasonably easy to integrate.
The Apollo data stack is an ambitious undertaking. Perhaps the complexity inherent to the project means it will be impossible to achieve the same level of simplicity that developing solely in Meteor has provided. But Apollo has great potential to become another tool in your arsenal to use when a situation calls for it.
This hands-on experience with Meteor and Apollo puts you in a better position to make that call.
Curious about how much it might cost to get help from an agency that specializes in Meteor & Apollo?
We're happy to provide a free estimate!